
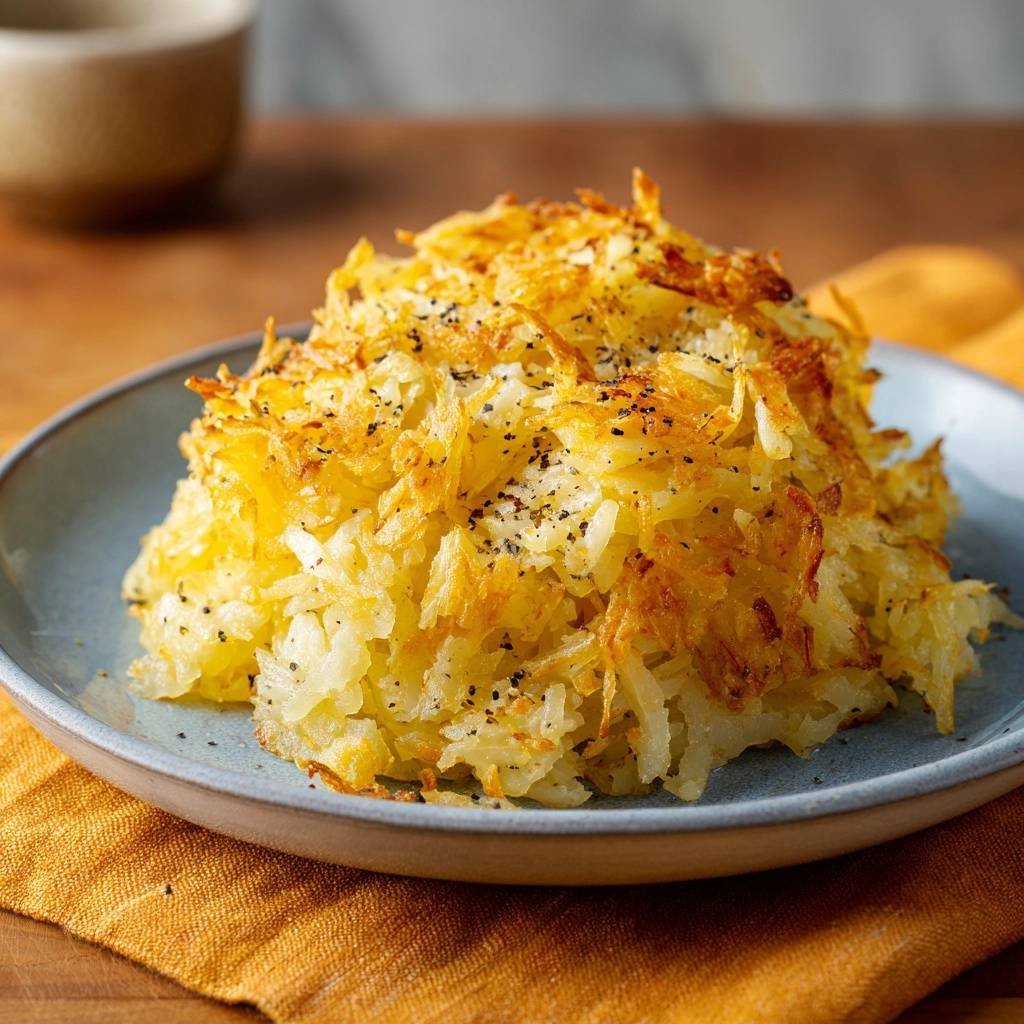
Learning how to make crispy hash browns at home is one of those skills that separates a decent breakfast from a great one. A proper hash brown is a study in contrast: shatteringly crisp on the outside, soft and steamy on the inside, with a deep golden color that makes the whole plate look better. Most homemade versions come out soggy, pale, or glued to the pan, which is why so many cooks assume restaurant-quality crisp is some professional secret. It is not. It comes down to starch, moisture, fat, and patience — all of which are fully in your control. Follow the method and the seven secrets below and your hash browns will come out of the pan crackling every single time.
The Basic Step-by-Step Method
Before the secrets, here is the core recipe. Every secret that follows explains why one of these steps matters.
- Choose and prep the potatoes. You need about 1 pound (roughly 2 medium) of russet potatoes per 2 servings. Peel them, then shred on the large holes of a box grater.
- Rinse the shreds. Put the shredded potato in a bowl of cold water, swish for a minute, then drain. This washes off excess surface starch that causes sticking and gummy texture.
- Dry them thoroughly. This is the most important step in the whole recipe. Squeeze the shreds in a clean kitchen towel or cheesecloth until no more water drips out, then spread them on a towel for a few minutes. Moisture is the enemy of crisp.
- Season. Toss the dry shreds with about 1/2 teaspoon of kosher salt and 1/4 teaspoon of black pepper per pound of potato. Some cooks season the finished hash browns instead; either works, but seasoning now distributes flavor evenly.
- Heat the pan and fat. Set a large cast-iron or heavy stainless skillet over medium-high heat. Add a thin film of neutral oil with a high smoke point, such as avocado or canola, plus a tablespoon of butter for flavor. Let the fat shimmer — the pan must be fully hot before the potatoes go in.
- Form the patty and press. Spread the shreds evenly over the bottom of the pan in a thin layer, no thicker than about 1/2 inch, and press down firmly with a spatula. A thin, compacted layer crisps; a thick pile steams.
- Cook undisturbed. Leave the patty alone for 4 to 6 minutes. Do not touch it, stir it, or peek at it. The crust needs continuous contact with the hot pan to form.
- Flip once. Slide a wide spatula under the patty, add a little more butter around the edges if the pan looks dry, and flip in one confident motion. If you are making one large patty and a single flip feels risky, cut it into two or four wedges and flip each piece separately.
- Finish the second side. Cook 4 to 5 minutes more until deeply golden. Transfer to a wire rack (not a plate, where trapped steam softens the crust) and serve immediately.
Secret 1: Use Russet Potatoes
The variety of potato matters more than almost anything else. Russets — the brown, rough-skinned baking potatoes — have high starch and low moisture, which is exactly the combination that browns deeply and crisps. Waxy potatoes like red or Yukon Gold hold their shape well in salads, but that firmness works against you in hash browns: they stay dense and never develop the lacy, shattered crust that makes the dish great. Reach for russets every time, and pick firm potatoes with no green tinge or sprouts.
Secret 2: Rinse Off the Starch
Shredding exposes a huge surface area of starch, and that surface starch turns into glue in the pan. A quick rinse in cold water washes the excess away, which does two things: it stops the shreds from clumping into a gummy mass, and it lets each shred brown independently so the patty develops texture instead of turning into one solid slab. One thorough rinse and drain is enough; a second rinse gives you diminishing returns and adds more water you then have to remove.
Secret 3: Squeeze Out Every Drop of Water
This is the secret that most recipes bury halfway down, and it is the one that changes everything. Potatoes are mostly water, and water in the pan becomes steam, and steam is the opposite of crisp. After rinsing, wring the shreds in a towel with real force until the towel is soaked and the potato looks fluffy and pale. You will be surprised how much water comes out — easily several tablespoons per pound. What goes into the pan should look dry and feel only slightly damp. If you skip this, no amount of extra cooking time will save the result, because the water has to evaporate before browning can even begin.
Secret 4: Use a Thin Layer and Press Hard
Crisp forms where potato touches hot metal. That means a thin layer — about half an inch, no more — with good contact across the whole surface. Heap the shreds too thick and the interior steams itself while the exterior barely browns. Pressing the layer down with a spatula right after it hits the pan is equally important: it maximizes contact and binds the patty together so it flips in one piece. If you are cooking for a crowd, cook in two batches rather than crowding one pan. Patience beats a thick, sad patty every time.
Secret 5: Get the Fat and Heat Right
Hash browns need both enough fat and enough heat. Too little oil and the shreds stick and scorch instead of frying; too much and the patty turns greasy. A thin, even film across the pan is the target, refreshed with a little more butter when you flip. As for heat, medium-high is the sweet spot — hot enough that the shreds sizzle immediately on contact, not so hot that the crust burns before the inside cooks through. If your burner runs hot, medium is fine; the test is sound. You want a lively sizzle the whole time, never a furious smoke or a timid hiss. Cast iron or another heavy pan is ideal because it holds heat steady when the cold potatoes land.
Secret 6: Leave It Alone, Then Flip Only Once
Every stir resets the clock on crust formation. Once the patty is in the pan, set a timer for four minutes and walk away. The shreds need unbroken contact with the hot surface to dehydrate, caramelize, and knit into a crust. Constant poking produces exactly the pale, broken result most people complain about. When the edges look deep golden and the patty slides as one piece, flip it — once — and give the second side the same undisturbed treatment. If you are nervous about a big flip, the wedge method described in the step-by-step makes it easy. Confidence matters here more than equipment.
Secret 7: Rest on a Rack, Never a Plate
A perfect crust dies in its own steam. Moving finished hash browns onto a plate traps hot vapor underneath, and within a minute the bottom you worked so hard on goes soft. A wire rack lets steam escape on all sides and keeps every surface crisp while you finish the rest of breakfast. If you do not have a rack, prop the plate up with a chopstick or set the hash browns on a folded paper towel in an open, airy spot — anything that keeps air moving under the crust. Salt lightly again right before serving, while the surface is hot and can grab the crystals.
Common Mistakes to Avoid
- Skipping the drying step. This is mistake number one, and it accounts for most soggy hash browns. If your crust never forms, water is almost certainly the reason.
- Using waxy potatoes. Red potatoes and similar waxy types stay firm instead of crisping. Stick with russets.
- Crowding the pan. A thick layer steams. Cook thin, or cook in batches.
- Stirring too much. Hash browns are not a stir-fry. Leave them alone until it is time to flip.
- Under-seasoning. Potatoes need salt. Taste a test shred after cooking and adjust — bland hash browns are worse than slightly salty ones.
- Using too little fat. The shreds should fry, not roast. A dry pan means sticking and uneven browning.
- Serving late. Hash browns are at their peak in the first five minutes out of the pan. Time your eggs and toast to finish with the potatoes, not before.
Easy Variations
Once you have the base method down, the same technique carries endless variations. Mix in finely diced onion or shallot for a classic diner-style flavor, keeping the layer thin so the onion cooks through. Shredded cheddar or pepper jack stirred through the hot shreds just before the flip melts into a gooey layer. Bell pepper and jalapeño add color and heat — dice them small and use a light hand so they do not release too much moisture. For a heartier version, fold in diced cooked bacon or sausage crumbles. You can also shape the seasoned shreds into individual patties or nest shapes for portion control; just remember that thicker shapes need slightly lower heat and a little more time so the center cooks through without burning the crust. Serve the finished hash browns alongside a stack of fluffy pancakes for a breakfast spread that covers both savory and sweet, and add some protein from your weekly meal prep chicken if you want a high-protein brunch plate.
Storage and Reheating Tips
Hash browns are best fresh, but leftovers can be handled well. Store cooked hash browns in an airtight container in the refrigerator for up to three days. The refrigerator will soften the crust — that is unavoidable — so reheating is about rebuilding it. The best methods are a hot skillet with a thin film of oil for two to three minutes per side, an oven or toaster oven at 400°F (about 200°C) for 8 to 10 minutes on a rack, or an air fryer at 375°F for 5 to 7 minutes, shaking once. Avoid the microwave entirely; it makes them limp and gummy. You can also freeze fully cooked hash browns: cool them on a rack, freeze in a single layer on a sheet pan, then bag them with the air pressed out for up to three months. Reheat from frozen in a hot skillet or oven, adding a few extra minutes.
Frequently Asked Questions
Why are my hash browns soggy instead of crispy?
Sogginess almost always comes from excess moisture. The fix is the drying step: rinse the shreds, then wring them out in a towel until they look dry. Other contributors are a pan that is not hot enough, too thick a layer of potato, and stirring instead of letting a crust form.
Do I have to peel the potatoes?
Peeling is recommended but not mandatory. The skin adds a slightly chewy, rustic texture and can make the shreds darker. For the classic crisp diner-style result, peel the potatoes before shredding.
Can I make hash browns from frozen shredded potatoes?
Yes, and it is a great shortcut. Thaw the frozen shreds completely in the refrigerator or in a colander at room temperature, then dry them aggressively in a towel — thawed shreds hold a surprising amount of water. Season, and cook exactly as you would fresh shreds.
What oil is best for hash browns?
A neutral oil with a high smoke point — avocado oil, canola oil, or vegetable oil — works best because hash browns cook over medium-high heat. Many cooks add a tablespoon of butter for flavor. Avoid extra-virgin olive oil as the sole fat; its lower smoke point can turn bitter at crisping temperatures.
How do I keep hash browns warm for a crowd?
Hold them on a wire rack set over a sheet pan in a 200°F oven (about 95°C). The low, dry heat keeps the crust crisp without overcooking the inside. Do not stack them and do not cover them with foil, which traps steam and softens the crust.
Why do my hash browns fall apart when I flip them?
Three usual causes: the first side has not cooked long enough to form a binding crust, the layer is too thick, or you skipped the pressing step that knits the shreds together. Give the patty a full 4 to 6 undisturbed minutes, press firmly at the start, and if a whole-pan flip still feels risky, cut the patty into wedges and flip each one separately.











3 thoughts on “How to Make Crispy Hash Browns at Home: 7 Secrets That Work”
Comments are closed.