
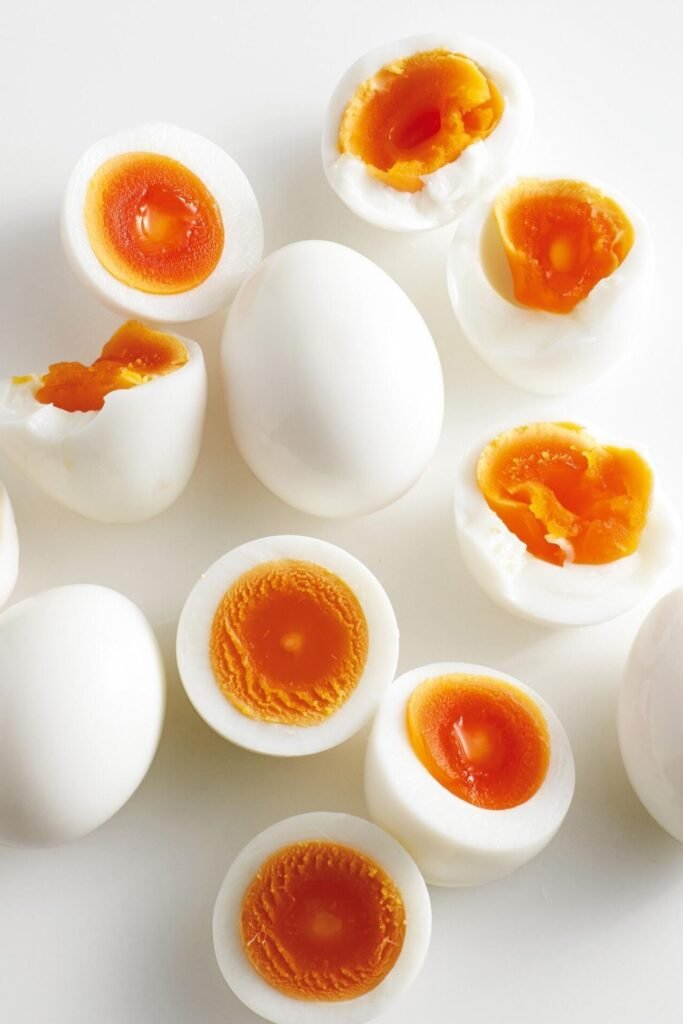
Hard boiled eggs should be the simplest thing in the kitchen: eggs, water, heat. Yet anyone who has peeled one to find a rubbery white and a yolk ringed with unappetizing gray-green knows the truth. That green ring means overcooking, and it brings a sulfurous smell and chalky texture with it. Learning how to make perfect hard boiled eggs without the green ring comes down to two things most recipes gloss over: precise timing and an immediate ice bath.
This guide gives you the exact method, the timing chart for every egg size, why the green ring forms in the first place, how to peel eggs cleanly every time, and how to store them for meal prep. Follow it once and you will never serve a gray-yolked egg again.
Why the Green Ring Forms
The green or gray ring around the yolk is a harmless but ugly chemical reaction. Egg whites contain sulfur, and yolks contain iron. When an egg cooks too long or at too high a heat, sulfur gases migrate from the white to the surface of the yolk, where they react with iron to form ferrous sulfide. That compound is the greenish-gray ring.
Two things drive the reaction: excessive cooking time and slow cooling. An egg that sits in hot water after cooking keeps reacting. That is why the ice bath matters as much as the timer. Stop the cooking fast, and the sulfur never gets its chance.
The Foolproof Method, Step by Step
Step 1: Choose the Right Eggs
Counterintuitively, very fresh eggs are harder to peel. In a fresh egg, the inner membrane clings tightly to the shell. Eggs that are 7 to 10 days old peel far more cleanly because a small air pocket has formed and the membrane has loosened. If you buy eggs specifically for boiling, let them sit in the refrigerator for about a week first.
Step 2: Arrange in a Single Layer
Place the eggs in a single layer at the bottom of a saucepan or pot. Do not stack them. Crowded eggs cook unevenly and crack against each other. Choose a pot just large enough to hold them with a little room to spare, then add cold water to cover the eggs by about one inch.
Starting with cold water and heating gradually gives the most even results for beginners. It is gentler on the shells, which means fewer cracks. Add a teaspoon of salt or a splash of vinegar to the water if you like; neither is required, but both help the white set quickly if a shell does crack.
Step 3: Bring to a Boil, Then Time It Exactly
Set the pot over high heat and bring the water to a full rolling boil. The moment it boils, reduce the heat to maintain a steady, gentle boil and start your timer. This is where precision pays off:
- 9 minutes: Firm white, yolk fully set but moist and deep yellow. Ideal for eating plain or in salads.
- 10 to 11 minutes: Classic hard boiled texture. Yolk fully firm, bright yellow, no green ring. The sweet spot for most uses.
- 12 minutes: Very firm yolk, slightly paler. Best for deviled eggs and slicing, where you want clean cuts.
- 14 minutes or more: Overcooked territory. Dry, crumbly yolk and the dreaded green ring. Avoid.
These times assume large eggs started in cold water. Medium eggs need about a minute less; extra-large need about a minute more. If you live well above sea level, water boils at a lower temperature, so add a minute or two to compensate.
Step 4: The Ice Bath (Do Not Skip This)
While the eggs cook, fill a large bowl with ice and cold water. The moment your timer goes off, transfer the eggs straight into the ice bath with a slotted spoon. Leave them for at least 10 to 15 minutes.
The ice bath does three critical jobs at once: it halts the cooking instantly so the green ring cannot form, it causes the egg to contract slightly inside the shell which makes peeling dramatically easier, and it firms up the white for a better texture. Skipping this step is the most common reason home cooks get green rings even with correct timing.
Step 5: Peel Cleanly
Crack the cooled egg gently all over by rolling it on a countertop with light palm pressure. Start peeling from the wider end, where the air pocket sits, and peel under a thin stream of cool running water. The water slips between the shell and the membrane and helps the shell release in large pieces instead of tiny shards.
If an egg resists, it probably needed more time in the ice bath or was too fresh. Let stubborn eggs sit in cold water for a few more minutes and try again. Never dig at the white with a fingernail; torn whites are worse than a slow peel.
The Alternative: Boil-First Method
Some cooks prefer lowering eggs into already-boiling water with a slotted spoon, then reducing to a gentle simmer for 10 to 12 minutes. This method gives very consistent timing because the cooking start point is exact, and many find it produces the easiest-peeling eggs of all. The trade-off is a higher risk of cracked shells from the temperature shock, so lower the eggs in gently and do not drop them. Either method works. Pick the one that fits your style and stick with it for consistent results.
Instant Pot and Steamer Options
If you own an electric pressure cooker, the popular 5-5-5 method works beautifully: 5 minutes at high pressure, 5 minutes of natural release, then 5 minutes in an ice bath. The eggs practically peel themselves. A vegetable steamer basket over boiling water for about 12 minutes, followed by the ice bath, is another reliable option that minimizes cracking since the eggs never knock against the pot.
Storing Hard Boiled Eggs
Hard boiled eggs are a meal prep staple, but storage rules matter for food safety. Keep them in their shells in the refrigerator and use them within one week. The shell is a natural protective barrier; peeled eggs should be eaten within two days and stored in a sealed container, ideally with a damp paper towel to prevent them drying out.
Never leave cooked eggs at room temperature for more than two hours. For packed lunches, use an insulated bag with an ice pack. And if an egg smells strongly of sulfur when peeled, or the white feels slimy, discard it. A faint sulfur scent is normal; a strong one is not.
Ways to Use Perfect Hard Boiled Eggs
Once you can produce flawless eggs on demand, they become one of the most versatile ingredients in your kitchen:
- Deviled eggs: The classic party appetizer. Firm 12-minute yolks mash smoothly with mayonnaise and mustard.
- Egg salad: Chop 10-minute eggs and mix with mayo, celery, and a pinch of paprika for sandwiches.
- Cobb salad: Quartered eggs add protein and color alongside bacon, avocado, and blue cheese.
- Ramen topping: Use the 9-minute timing for a slightly jammy yolk that elevates a bowl of noodles.
- Grab-and-go snack: Two eggs with a pinch of flaky salt and pepper make a satisfying high-protein snack.
If you enjoy make-ahead cooking, pair this skill with our guides on how to make crispy hash browns at home, meal prep chicken for the week without drying out, and how to store fresh herbs so they last longer.
Mistakes to Avoid
- Guessing the time. Two extra minutes is the difference between a bright yolk and a green ring. Set a timer every single time.
- Skipping the ice bath. Residual heat keeps cooking the egg for minutes after you drain the pot. The ice bath is not optional if you want perfect results.
- Boiling too violently. A violent rolling boil bangs eggs against the pot and each other, cracking shells. A steady gentle boil cooks just as well.
- Using the freshest eggs. Save farm-fresh eggs for frying and scrambling. Week-old eggs peel far more cleanly when boiled.
- Overcrowding the pot. Stacked eggs cook unevenly and crack. One layer, with room to spare, every time.
Frequently Asked Questions
Is the green ring on a hard boiled egg safe to eat?
Yes, it is completely safe. The green ring is ferrous sulfide, a harmless compound formed when iron in the yolk reacts with sulfur in the white during overcooking. It looks unappetizing and can taste slightly sulfurous, but it is not dangerous.
Why are my hard boiled eggs so hard to peel?
The usual culprits are very fresh eggs, skipping the ice bath, or under-cooling. Use eggs that are at least a week old, ice-bath for a full 10 to 15 minutes, and peel under running water starting from the wide end.
How long do hard boiled eggs last in the refrigerator?
Up to one week in the shell, stored in the refrigerator. Peeled eggs last about two days in a sealed container. Keep them refrigerated at all times and discard any that smell strongly of sulfur or feel slimy.
Can I reheat hard boiled eggs?
You can warm them gently in hot (not boiling) water for a few minutes. Never microwave a whole egg in its shell; steam buildup can make it explode. For sliced eggs, brief warming in a pan is fine.
What is the best timing for deviled eggs?
Cook for a full 12 minutes so the yolks are completely firm and easy to mash smoothly. Then ice-bath thoroughly. Firm yolks give you the creamiest filling.
Do I need to add vinegar or salt to the water?
Neither is required for perfect eggs, but both are useful insurance. Salt raises the water temperature slightly, and vinegar helps the white coagulate fast if a shell cracks, keeping the egg intact instead of leaking wispy whites into the pot.












1 thought on “How to Make Perfect Hard Boiled Eggs (No Green Ring)”
Comments are closed.