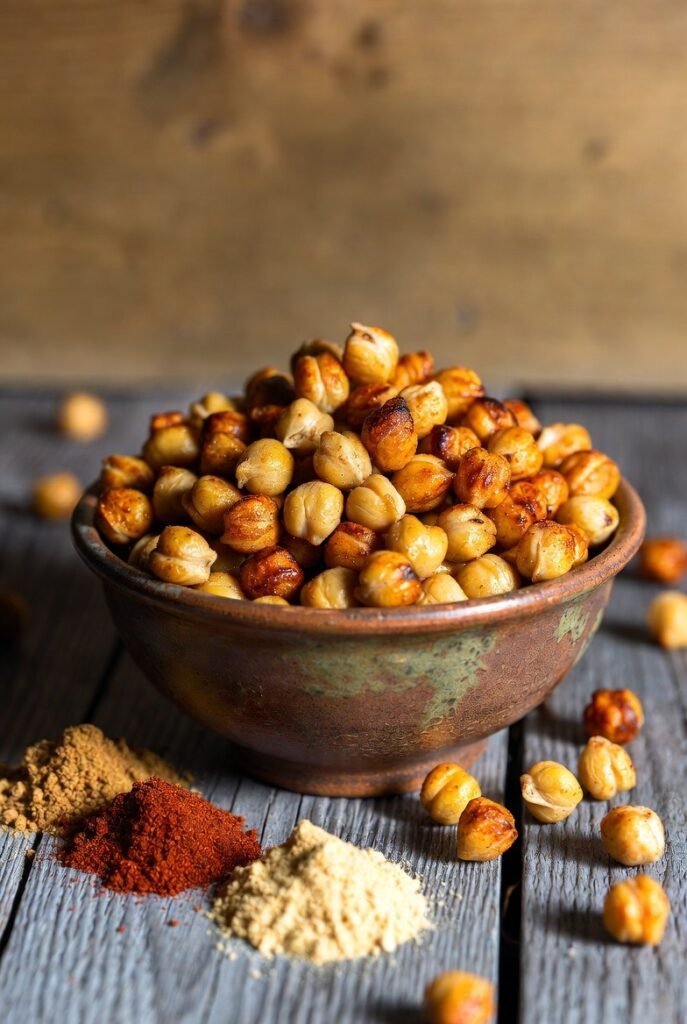
Learning how to make crispy roasted chickpeas without oil unlocks one of the best healthy snacks you can make at home: crunchy, savory, high in protein and fiber, and endlessly customizable — with no oil needed at all. Most roasted chickpea recipes call for a generous glug of olive oil, but oil is not what makes them crispy. Crispiness comes from driving the moisture out of the chickpea, and you can do that with dry heat alone.
This guide gives you the full oil-free method, the science of why each step matters, seasoning ideas, and the mistakes that leave chickpeas soggy instead of crunchy.
Why Skip the Oil?
There are good reasons to roast chickpeas without oil. It cuts a significant number of calories per serving, which matters if chickpeas are your everyday snack rather than an occasional treat. It also makes the recipe work for anyone following an oil-free diet. And practically speaking, oil-free chickpeas store better — oil can turn rancid and make stored snacks taste stale faster, while dry-roasted chickpeas stay crunchy longer in an airtight container.
The trade-off is honest: oil helps seasonings stick and adds richness. Without it, you need the right technique — thorough drying, high heat, and seasoning applied at the right moment — to get chickpeas that are genuinely crispy rather than just baked. Follow the steps below and you will not miss the oil.
Ingredients
- 2 cans (15 oz each) chickpeas, drained and rinsed — or about 3 cups cooked chickpeas
- 1 teaspoon fine sea salt, plus more to taste
- 1 to 2 teaspoons seasoning of your choice (see ideas below)
- Optional: a light mist of water or aquafaba (the chickpea canning liquid) to help seasoning adhere
- Optional: 1 tablespoon lemon juice or vinegar for tangy variations
Equipment: rimmed baking sheet, parchment paper, clean kitchen towels or paper towels, a large bowl.
Step-by-Step: Crispy Oil-Free Roasted Chickpeas
Step 1: Dry the chickpeas thoroughly (the most important step)
Spread the rinsed chickpeas on a clean kitchen towel or several layers of paper towels. Gently roll them around and let them air-dry for at least 30 minutes — an hour is even better. Then pat each one dry. Some skins will slip off; that is fine, and removing loose skins actually improves crispiness. Any surface moisture turns to steam in the oven, and steam is the enemy of crunch. If you skip the drying, you will get chewy chickpeas no matter what else you do right.
Step 2: Preheat properly
Heat the oven to 400°F (200°C) with the rack in the center position. Do not put the chickpeas in during preheating — they need to hit full heat immediately so the exterior starts crisping before the interior dries out. Line a rimmed baking sheet with parchment paper for easy cleanup and to prevent sticking.
Step 3: Roast naked first
Spread the dried chickpeas in a single layer on the baking sheet with space between them — crowding causes steaming. Roast for 20 minutes before adding any seasoning. This is the key oil-free trick: seasoning (especially salt) draws moisture to the surface, so seasoning at the start works against crispiness. The first 20 minutes drives off the remaining interior moisture.
Step 4: Season and roast again
Pull the pan out and shake it, or toss the chickpeas in a bowl. This is when you add salt and seasonings. For the seasoning to stick without oil, mist the chickpeas very lightly with water from a spray bottle — just enough to make the surface tacky, not wet — then toss with your spice mix. Return to the oven for another 10 to 15 minutes, shaking the pan halfway through.
Step 5: The doneness test
Chickpeas are done when they are golden-brown, feel light for their size, and rattle crisply when you shake the pan. Bite one: it should shatter with a crunch all the way through, not just on the outside. If the center is still soft or chewy, give them another 5 minutes. Then — and this matters — turn off the oven, crack the door, and let them cool in the oven for 15 to 20 minutes. They continue crisping as they cool, and this step makes the difference between “pretty crunchy” and “snack-aisle crunchy.”
Total time: about 15 minutes of active work plus 45 to 60 minutes in the oven including cooling.
Seasoning Ideas (All Oil-Free)
Apply 1 to 2 teaspoons total per batch, after the initial 20-minute roast:
- Classic sea salt: just salt. Simple, perfect, lets the nutty chickpea flavor shine.
- Smoky paprika: smoked paprika + salt + a pinch of garlic powder.
- Everything bagel: everything bagel seasoning straight from the jar.
- Curry: curry powder + salt + a tiny pinch of cayenne.
- Ranch-style: dried dill + garlic powder + onion powder + salt.
- Sweet cinnamon: cinnamon + a teaspoon of sugar or coconut sugar + tiny pinch of salt. Add the sugar only in the last 10 minutes so it does not burn.
- Lemon pepper: toss with lemon juice before the final roast, then lemon pepper seasoning.
Mistakes to Avoid
- Skipping the drying step. Wet chickpeas steam instead of roast. This single mistake causes most soggy results.
- Crowding the pan. Chickpeas need space for hot air to circulate. Use two pans rather than piling them on one.
- Seasoning too early. Salt at the start draws out moisture and works against crispiness. Season after the first 20 minutes.
- Roasting at too low a temperature. Below 375°F, chickpeas dry out slowly and turn leathery rather than crispy. 400°F is the sweet spot.
- Storing while warm. Any residual warmth creates condensation in the container, and condensation kills crunch. Cool completely first.
- Using the microwave to “re-crisp.” It makes them rubbery. If a stored batch softens, 5 minutes in a hot oven restores the crunch.
Air Fryer Variation
No oven, or do not want to heat up the kitchen? The air fryer makes excellent oil-free chickpeas. Preheat to 390°F, spread the dried chickpeas in a single layer in the basket (work in batches — crowding is even more punishing in an air fryer), and cook for 12 to 15 minutes, shaking the basket every 5 minutes. Season after cooking using the same light-mist trick, then give them 2 more minutes so the seasoning sets. Air-fried chickpeas come out slightly crunchier than oven-roasted ones because the circulating air strips surface moisture aggressively.
Serving Ideas Beyond Snacking
Crispy chickpeas earn their keep in more than the snack bowl. Toss them warm over a grain bowl for crunch, scatter them on creamy soups like tomato or butternut squash instead of croutons, or fold them into a chopped salad where they stay crunchy far longer than nuts do under dressing. For parties, put out two or three seasoned batches — smoky paprika, ranch-style, and sweet cinnamon — and watch which bowl empties first.
Storage and Meal Prep
Cool the chickpeas completely, then store in an airtight container or jar at room temperature. They stay crispy for 4 to 5 days — noticeably longer than oil-roasted versions. Do not refrigerate; the fridge’s humidity softens them. Make a double batch on the weekend and portion into small containers for grab-and-go snacks through the week. They are also excellent scattered over salads and grain bowls in place of croutons.
Nutrition note: A one-cup serving of roasted chickpeas delivers substantial protein and fiber, making them far more satisfying than chips or crackers. This article is for informational purposes only and is not medical advice — if you have specific dietary needs or conditions, consult a qualified professional.
If you love the crispy-snack technique, the same principles apply to other foods — see our guide to making crispy hash browns at home for the moisture-removal secrets behind another crunchy favorite. For more healthy kitchen ideas, try making oatmeal taste good without adding sugar, and if you are batch-cooking for the week, our meal prep chicken guide keeps protein juicy for days.
Frequently Asked Questions
Can you really get crispy chickpeas without any oil?
Yes. Crispiness comes from removing moisture with dry heat, not from oil. The keys are drying the chickpeas thoroughly before roasting, using high heat (400°F), not crowding the pan, and letting them cool in the turned-off oven.
Should I use canned or dried chickpeas?
Either works. Canned chickpeas are convenient — just drain, rinse, and dry very well. If cooking from dried, cook them until tender but not mushy, then dry them the same way. Slightly firmer chickpeas crisp up best.
Why are my roasted chickpeas chewy instead of crispy?
The most common causes: they went into the oven still damp, the pan was overcrowded, the oven temperature was too low, or they were seasoned before the initial moisture-driving roast. They may also just need more time — keep roasting in 5-minute increments until one shatters when you bite it.
How do I make the seasoning stick without oil?
A very light mist of water from a spray bottle after the first 20 minutes of roasting makes the surface just tacky enough for spices to cling. Aquafaba (chickpea canning liquid) works too. Do not soak them — a mist is enough.
How long do oil-free roasted chickpeas stay crispy?
Four to five days in an airtight container at room temperature, as long as they cooled completely before storing. If they soften, 5 minutes in a 400°F oven brings back the crunch.
Are roasted chickpeas healthy?
They are a nutritious snack — high in protein and fiber, naturally gluten-free and vegan. Roasting without oil keeps the calorie count lower than oil-roasted versions or chips. As with any snack, portion size matters.