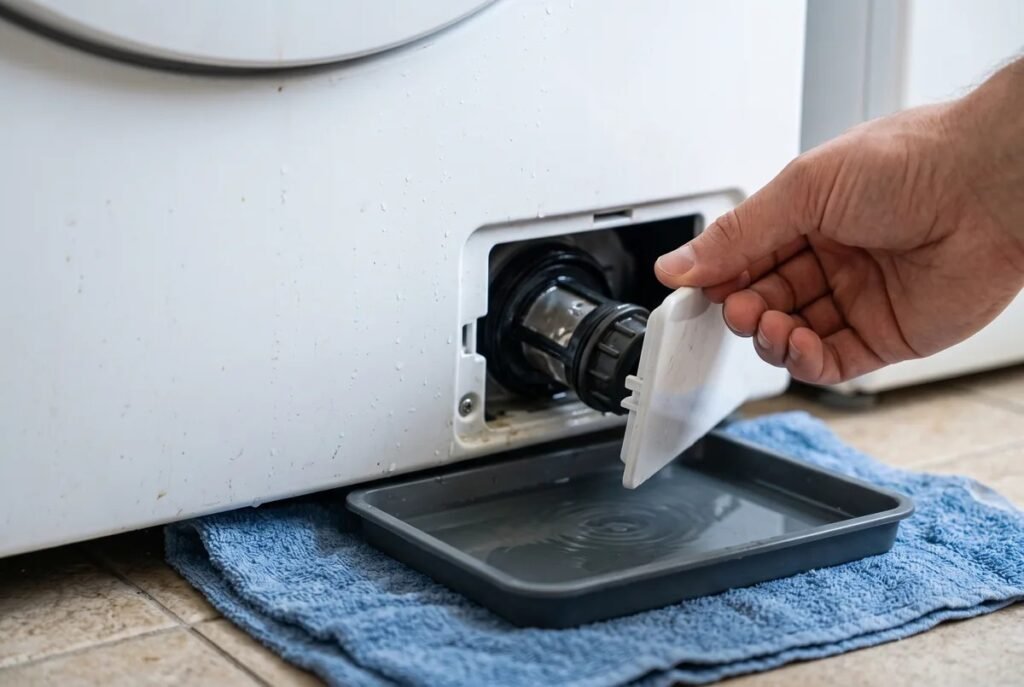
If your washer drains slowly, leaves clothes smelling damp, stops mid-cycle, or shows a drain error, the cause is often simpler than you think. Learning how to clean a washing machine filter without tools can fix many of these problems in under half an hour, using nothing more than your hands, a towel, a shallow tray, and an old toothbrush. The filter is designed to be removed by hand, so you do not need pliers, wrenches, or any special equipment. This guide walks you through finding it, opening it safely, cleaning it properly, and putting it back so your machine runs the way it should.
Most people never touch the filter until something goes wrong. Every load sends lint, hair, sand, coins, and small objects toward the drain pump, and the filter catches them before they can damage it. Over time, trapped material builds into a slimy layer that slows drainage and traps odors. A quick, regular clean prevents that buildup and keeps laundry smelling fresh.
What the Washing Machine Filter Does
Think of the filter as a small strainer that guards the drain pump. Water leaving the drum passes through it on its way out of the machine. Large debris stays in the filter while water flows through. Without that guard, a coin, a hairpin, or a clump of lint could jam the pump impeller, burn out the motor, or block the drain hose completely.
Front-loading machines usually have a drain pump filter behind a small flap at the bottom front. Many top-loading machines have a lint filter inside the drum, near the top rim, or inside the agitator, and some have a pump filter at the back or underneath. If you are unsure which type you have, check the care section of your manual for drain filter, pump filter, or lint filter.
Signs Your Filter Needs Cleaning
Clean the filter when you notice any of these warning signs: clothes come out wetter than usual, the drain cycle takes much longer, the machine pauses with water still in the drum, you see a drain or blocked-pump error, there is a musty smell even after a cleaning cycle, water leaks from the front bottom corner, or you hear rattling during draining.
Even without symptoms, check every one to three months. Homes with pets, long hair, or frequent towel and bedding loads may need to check more often, since those loads shed far more lint and debris.
Safety First: Unplug Before You Start
Before you touch the filter, unplug the machine from the wall outlet. This is not optional. You will be working near water and near the pump area, and unplugging removes any risk of the machine starting unexpectedly or of an electrical fault while your hands are wet. If the outlet is hard to reach, switch the machine off at its dedicated circuit breaker instead, and make sure no one else can switch it back on while you work.
Never force a stuck filter. If the cap will not turn by hand with firm, steady pressure, stop. Forcing it can crack the housing, strip the threads, or snap the handle, turning a simple clean into an expensive repair. Instead, try the gentle methods in the troubleshooting section below, such as wiggling the cap slightly back and forth, clearing debris from around the seal, or letting any trapped water drain fully first. If it still will not move, leave it alone and call a repair technician. A stuck filter is frustrating, but a broken housing is far worse.
Also, be prepared for water. Even after a normal cycle, several cups can remain in the filter housing and drain hose. Lay towels down, keep a shallow tray ready, and wear rubber gloves if you prefer.
What You Need
You genuinely need no tools. Gather old towels, a shallow tray, a bucket, an old toothbrush, mild dish soap, white vinegar if you like a natural deodorizer, and a bin for debris. Do not reach for pliers to grip the cap, because they can crack the plastic. Your hands give you better feedback about how much pressure is safe.
Step by Step: Cleaning a Front-Load Drain Filter
These steps cover the most common design, a front-load drain pump filter behind a small door at the bottom front. If your machine looks different, the same principles apply: stop the water, open the cover gently, drain, remove, clean, replace, and test.
Step 1: Empty the machine and unplug it
Remove all laundry from the drum and check pockets one more time, since a forgotten item is often the source of the clog. Unplug the machine. If the drum still holds standing water, try a drain-only or spin-only cycle first, but if the pump is blocked that may not work. In that case, proceed carefully with towels ready, because water will come out when you open the filter.
Step 2: Locate the filter door
Kneel down and look along the bottom front of the machine for a small flap, usually on the left or right side. Some doors press inward to open, some have a small tab you pull, and some slide sideways. Open it gently by hand. Behind it you should see a round filter cap, often with a handle, and sometimes a small emergency drain hose with a plug at the end.
Step 3: Drain the remaining water first
If your machine has a small drain hose, pull it out slowly, place its end in your shallow tray, and remove the plug. Let the water drain, emptying the tray into a bucket as needed. If there is no drain hose, place the tray directly under the filter cap and tilt the machine very slightly forward if you can do so safely, or simply be ready with towels. This step keeps the floor much drier and reduces the rush of water when the cap comes off.
Step 4: Unscrew the filter cap by hand
Turn the cap counterclockwise slowly. Most caps need only a half turn or a few full turns before they come free. Keep the tray underneath, because more water will trickle out as the seal breaks. Pull the filter straight out toward you. Note how it sits, so you can return it the same way. Take a quick look inside the empty housing with a flashlight if you have one, to spot any object that did not come out with the filter.
Step 5: Remove debris and rinse the filter
Pull off lint, hair, and any objects by hand and drop them in the trash. Check for coins, buttons, hairpins, bra underwires, small socks, tissues that dissolved into pulp, and bits of paper. Then rinse the filter under warm running water. Use the old toothbrush with a drop of mild dish soap to scrub the mesh, the grooves, and the rubber seal. For a stubborn smell, soak the filter in warm water with a splash of white vinegar for ten to fifteen minutes, then scrub and rinse again. Never use harsh bleach or abrasive pads on the filter, since they can damage the mesh and the seal.
Step 6: Clean inside the housing
While the filter soaks, wipe inside the empty housing with a damp cloth. Reach in gently and remove any slime or debris you can feel, but do not poke sharp objects into the pump area or try to spin the impeller forcefully. If you can see the impeller blades, check that nothing is wrapped around them, and remove loose material with your fingers only. Wipe the threads where the cap seals, because grit there can cause a slow leak later.
Step 7: Replace the filter and close the door
Slide the clean filter back in exactly the way it came out, then turn it clockwise until it feels snug. It should sit flush and feel firm, but do not overtighten it. A cap that is cross-threaded or only half seated will leak, so if it feels crooked, back it out and try again gently. Replace the drain hose plug if you used one, tuck the hose back, and close the filter door.
Step 8: Test with a short cycle
Plug the machine back in, wipe the floor dry, and run a short rinse and spin cycle with the drum empty. Watch the filter area for the first few minutes. No drips should appear, drainage should sound smooth, and the machine should finish without a drain error. If everything looks good, run your next normal load with confidence. Keep the towels nearby for that first load, just in case a seal needs one more small adjustment.
Cleaning a Top-Load Lint Filter
Top-load machines vary more, so adapt the steps to your design. Many have a mesh lint filter that lifts out of the drum wall or the top rim: pull it out by hand, peel off the lint, rinse it under warm water, and scrub it with a soft brush if soap film has built up. Some sit inside the agitator cap, which twists off by hand. In every case, remove by hand, clean with water and mild soap, dry it off, and replace it fully seated. If your top-load machine also has a pump filter, follow the front-load steps above for that part, unplugging the machine first and draining water before opening it.
How Often Should You Clean It
As a starting point, check the filter once a month if you do laundry most days, and at least once every three months if you wash less often. After washing a load that contained a tissue, a paper receipt, a small rug, or pet bedding, check it sooner rather than later. After a load of muddy sports clothes or beach towels, a quick check is also wise, because sand settles in the filter and can wear down the pump over time.
Pair this check with another monthly household task to make it routine. If you consistently find very little debris, stretch the interval; if you consistently find a lot, shorten it.
Mistakes to Avoid
The most common mistake is skipping the unplugging step, which is never worth taking. The second is forcing a stuck cap, which can crack the housing and cause a costly leak. A third is forgetting to drain the water first, which floods the floor. A fourth is reinstalling the filter loosely or crooked, which leads to slow drips. A fifth is using harsh chemicals or steel wool, which damages the mesh and seal. Finally, wipe the door seal and detergent drawer in the same session, since they also harbor odor-causing buildup.
Troubleshooting After Cleaning
If the machine still drains slowly after cleaning, check that the drain hose is not kinked, squashed behind the machine, or pushed too far into the standpipe. Make sure the filter is seated correctly and the cap is snug. Run an empty hot cycle with a washing machine cleaner or a cup of white vinegar to clear soap residue from the drum and hoses. If the error persists, if water leaks from anywhere other than the filter cap, or if the pump makes a loud grinding noise even with a clean filter, stop using the machine and arrange a repair. Continuing to run a machine with a failing pump can cause water damage to the floor and to the machine itself.
FAQs
How do I know where my washing machine filter is?
On most front-load machines, look for a small flap at the bottom front of the machine. On many top-load machines, the lint filter is inside the drum wall, near the top rim, or inside the agitator. If you cannot find it, check the care section of your manual for drain filter, pump filter, or lint filter, and look for a round cap with a handle low on the machine.
Can I clean the filter without turning off the water supply?
For a front-load drain filter, unplugging the machine is the essential safety step, and you should also turn off the water supply valves behind the machine if you can reach them easily. That extra step prevents any accidental intake of water while you work, and it costs only a moment.
What should I do if the filter is stuck?
Never force a stuck filter. Drain all water from the housing first, clean grit from around the cap, and try gentle back-and-forth movement by hand. If it still will not move with firm hand pressure, stop and call a repair technician. Forcing it can crack the housing and cause a leak.
How often should I clean my washing machine filter?
Check it once a month if you wash most days, and at least once every three months for lighter use. Check sooner after loads with tissues, pet bedding, sandy clothes, or small items that may have escaped a pocket. Households with pets or long hair usually need the shorter interval.
Why does my washer still smell after I clean the filter?
Odor can also live in the door seal, the detergent drawer, and the drum itself. After cleaning the filter, wipe the seal folds, clean the drawer, and run an empty hot cycle with a washing machine cleaner or white vinegar. Leaving the door slightly open between loads also helps the drum dry and stay fresh.
Do I need to replace the filter, or just clean it?
In most cases, cleaning is enough. Replace the filter only if the mesh is torn, the seal is cracked or flattened, the handle is broken, or the cap no longer seats snugly and leaks. A replacement filter is usually inexpensive and specific to your model, so match the part number before ordering.