

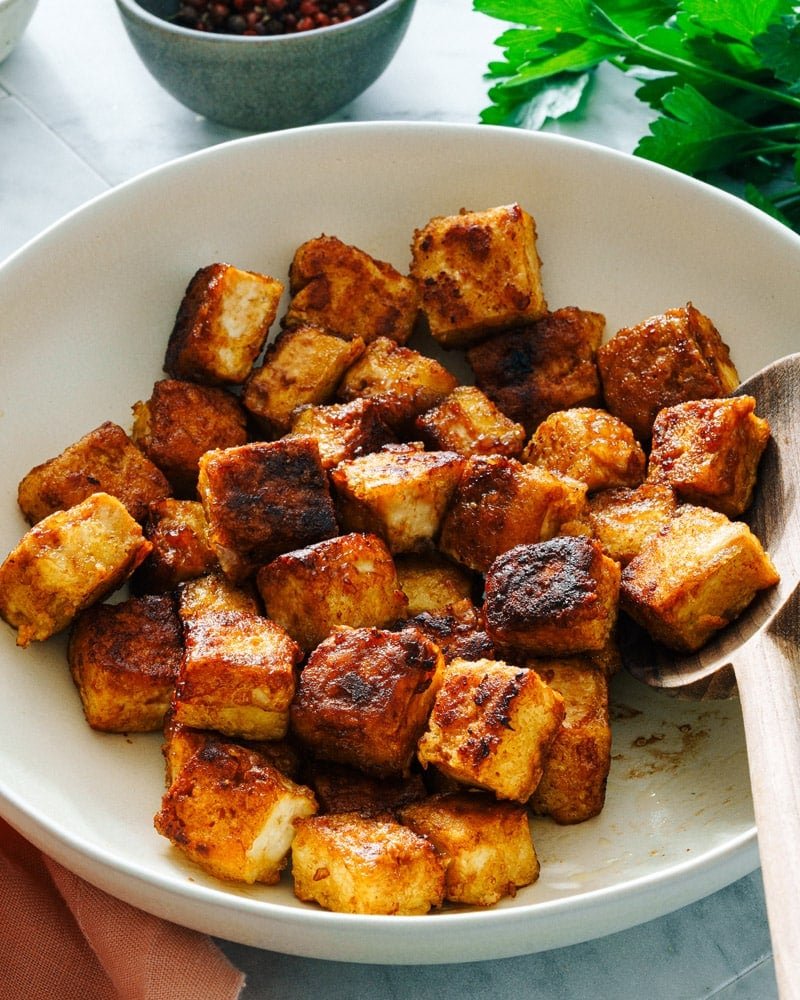
Why Crispy Tofu Does Not Need a Deep Fryer
If you want to know how to make crispy tofu without deep frying, here is the reassuring truth: crispiness was never about the vat of oil. It is about three things — removing moisture from the tofu, giving it a thin starchy coating, and hitting it with enough dry heat that the surface browns and sets before steam can soften it. Deep frying does all three at once, but your oven, air fryer, or a good skillet can do exactly the same job with a fraction of the oil.
The result is golden cubes with a shattering outer crust and a tender, slightly chewy center — the kind of tofu that converts skeptics. This guide walks you through every step: choosing the right block, pressing it properly, picking a coating, and three proven methods (oven, air fryer, and stovetop), plus oil amounts, temperatures, sauces that keep the crunch intact, and fixes for every common failure.
Step 1: Buy the Right Tofu
Everything starts at the grocery store. For crispiness, you need extra-firm tofu — it has the lowest water content and holds its shape when cubed, coated, and blasted with heat. Firm tofu works in a pinch, but medium, soft, or silken tofu will fall apart and never crisp, no matter what you do. This is the single most important ingredient decision in the whole process.
Check the label and the date. Fresher tofu has better flavor and a firmer set. Vacuum-packed extra-firm tofu is even lower in moisture and crisps beautifully. Avoid any block that feels mushy through the package or smells sour when opened.
Step 2: Press Out the Water
Pressing is the non-negotiable step. A block of tofu can hold a surprising amount of water, and that water is the enemy of crispiness — it steams the surface from the inside out and keeps coatings from sticking.
The basic pressing method: Drain the block and wrap it in a clean kitchen towel or several layers of paper towels. Set it on a plate, place something heavy on top — a cutting board with a few cans, a cast-iron skillet, or a dedicated tofu press — and leave it for 15 to 30 minutes. Change the towel once if it becomes soaked. That is it.
The freeze-thaw upgrade: If you have time, freeze the whole block in its package, thaw it completely in the fridge or in warm water, then press. Freezing forms ice crystals that push water out and leave tiny pockets behind, giving the tofu a chewier, almost meaty texture that crisps even better.
After pressing, cut the block into cubes roughly three-quarters of an inch to one inch across. Smaller pieces give you more crispy surface area per bite. Tearing the tofu into rough chunks instead of neat cubes also works — the craggy edges catch more coating and brown deeper.
Step 3: Choose Your Coating
A thin starch coating is what builds the crunchy shell. The coating fries in the small amount of oil you use, forming a crisp crust while the interior stays tender. Here is how the three popular options compare.
Cornstarch: The Crispiest and Lightest
Cornstarch is the top choice for maximum crunch with minimal heaviness. It forms a delicate, glassy crust that shatters when you bite it — the closest you can get to a deep-fried texture without the deep fryer. Use 2 to 3 tablespoons per standard 14-ounce block. Toss the cubes gently in a bowl or shake them in a zip-top bag until every piece is dusted with a thin, even layer. Shake off any excess before cooking; thick clumps turn gummy instead of crisp.
All-Purpose Flour: Sturdier and Sauce-Friendly
Regular flour gives a slightly thicker, more substantial crust. It does not get quite as shattering-crisp as cornstarch, but it holds up better when you toss the tofu in sauce afterward, since the sturdier coating resists softening. A 50-50 blend of cornstarch and flour is a popular compromise: crispness from the starch, staying power from the flour.
Panko Breadcrumbs: Maximum Crunch, Watch the Heat
Panko creates the crunchiest, most textured crust of all — think Japanese-style fried tofu. The trade-off is that panko browns fast and can burn before the inside heats through, especially in the oven or air fryer. If you use panko, dip the cubes first in a little plant milk or a beaten egg (if you eat eggs), then press the crumbs on firmly. Cook at a slightly lower temperature and check early.
Seasoning the Coating
Plain starch crisps fine but tastes like nothing. Mix your dry seasonings right into the coating: salt, garlic powder, onion powder, smoked paprika, black pepper, and a pinch of cayenne are a reliable base. About half a teaspoon of salt per block is a good starting point. Do not use wet marinades before cooking — the liquid re-wets the surface and works against everything you just did. Add wet flavors after crisping instead.
Method 1: Oven-Baked Crispy Tofu
The oven method is the most hands-off and the best choice for a big batch. It uses the least oil and gives even browning on all sides if you flip once.
- Heat the oven to 425°F (220°C). Line a large rimmed baking sheet with parchment paper — this prevents sticking far better than oiling the pan directly.
- Toss the pressed, cubed tofu with 1 to 2 tablespoons of neutral oil (avocado, canola, or grapeseed) until lightly coated, then toss in your seasoned cornstarch until every cube is dusted.
- Spread the cubes in a single layer with space between them. Crowding traps steam and steams the tofu instead of crisping it. Use two pans if needed.
- Bake for 25 to 30 minutes, flipping each cube halfway through with a spatula. The tofu is done when it is deeply golden and feels firm and dry to the touch.
- Let the cubes rest on the pan for 2 to 3 minutes. They crisp further as they cool slightly.
Method 2: Air Fryer Crispy Tofu
The air fryer is arguably the fastest route to crispy tofu without deep frying. Its small chamber and powerful fan mimic a convection oven at high speed, giving deep, even browning with barely any oil.
- Preheat the air fryer to 400°F (200°C) for about 3 minutes.
- Press, cube, and coat the tofu as described above. A light spritz or half-teaspoon toss of oil is enough — the coating and the circulating heat do the rest.
- Arrange the cubes in a single layer in the basket. Do not pile them; cook in two batches if your basket is small.
- Cook for 12 to 16 minutes, shaking the basket or flipping the cubes at the halfway mark. Check a minute or two early the first time, since air fryers vary.
- Pull the tofu when the cubes are golden brown all over and rattle loosely in the basket.
If your air fryer runs hot, 375°F gives great results with less risk of the coating scorching.
Method 3: Stovetop Pan Sear
Pan-searing gives the deepest, most restaurant-like browning because the tofu sits in direct contact with the hot surface. It takes a little more attention, but the crust is superb.
- Use a heavy skillet — cast iron or stainless steel — over medium-high heat. Let the pan get properly hot before the tofu goes in.
- Add 2 to 3 tablespoons of neutral oil with a high smoke point. The pan should have a thin, shimmering layer; you are shallow-frying, not deep-frying.
- Add the coated cubes in a single layer without crowding. Work in batches if needed.
- Cook undisturbed for 3 to 4 minutes per side. Here is the key: do not flip early. A proper crust forms first and then releases from the pan on its own. If a cube resists your spatula, it is not ready — give it another minute.
- Turn and brown the remaining sides, then drain briefly on a wire rack or paper towel.
Whichever pan you use, resist the urge to press the cubes down — that squeezes out moisture and makes the coating soggy.
Oil and Temperature Quick Guide
You do not need much oil for any of these methods. A useful summary:
- Oven: 1 to 2 tablespoons per block; 425°F for 25–30 minutes.
- Air fryer: a light spritz or 1 teaspoon per block; 400°F for 12–16 minutes.
- Stovetop: 2 to 3 tablespoons in the pan; medium-high heat, 3–4 minutes per side.
Choose neutral oils with high smoke points — avocado, canola, grapeseed, or refined peanut oil. Olive oil works for the oven method but can smoke on a ripping-hot stovetop. Doneness is visual: look for an even, deep golden color and a dry, firm feel. If you are unsure, sacrifice one cube and bite it — the center should be hot and tender, the shell crisp.
Sauces and Flavor Pairings
Here is the golden rule of saucing: crisp first, sauce second. Tossing wet sauce over freshly crisped tofu will soften the crust within minutes. Instead, toss the hot cubes in sauce right before serving so the outside stays crunchy while the coating drinks up flavor.
Sauces that love crispy tofu:
- Soy-ginger glaze: soy sauce, grated ginger, garlic, a splash of rice vinegar, and a touch of honey or maple syrup.
- Spicy gochujang: gochujang paste thinned with a little soy sauce and sesame oil — sweet heat that clings to the crust.
- Peanut sauce: peanut butter, soy sauce, lime juice, and warm water to thin; great over rice bowls.
- Teriyaki: a quick homemade version with soy sauce, brown sugar, garlic, and ginger beats the bottled kind.
- Buffalo style: toss in hot sauce mixed with melted butter or vegan butter for game-day tofu bites.
For dry flavor, sprinkle the hot cubes with salt, chili flakes, or nutritional yeast the moment they come off the heat. Serve crispy tofu over rice bowls, in tacos or wraps, on salads, or add it to stir-fries at the very end so the sauce coats without stewing.
Common Mistakes to Avoid
- Skipping the press. This is the number one reason for limp tofu. Even 15 minutes of pressing transforms the result.
- Using the wrong tofu. Silken or soft tofu cannot crisp — extra-firm is the only reliable starting point.
- Too thick a coating. A heavy paste of starch turns gummy. You want a whisper-thin dusting; shake off the excess.
- Crowding the pan or tray. Cubes packed together steam instead of brown. Give every piece breathing room.
- Heat too low. Crispy tofu needs assertive heat. A lukewarm oven or a pan that never got hot gives you pale, rubbery cubes.
- Flipping too early. On the stovetop, the crust must set before it releases. Patience builds the brown.
- Saucing too soon. Wet sauce before crisping ruins the crust. Cook, then toss, then serve immediately.
- Forgetting salt. Tofu is bland by nature. Season the coating, not just the sauce, so every bite has flavor.
Troubleshooting: Fixing Soggy or Sticking Tofu
My tofu came out soggy. Almost always a moisture problem. Press longer next time, try the freeze-thaw method, make sure the cubes have space around them, and confirm your oven or pan was fully hot before the tofu went in.
The coating fell off. The surface was probably still wet when you coated it, or the layer was too thick. Pat the pressed cubes dry before coating, use a thinner dusting, and let the crust set undisturbed for the first few minutes of cooking.
It stuck to the pan. The pan was not hot enough, or you flipped too soon. Heat the skillet fully, add the oil, wait for it to shimmer, and then wait for the crust to release on its own. Parchment paper in the oven and a light oil spray in the air fryer prevent sticking there.
The outside is crisp but the inside is cold or bland. Your cubes may be too large, or the heat too high — the shell set before the center warmed through. Cut smaller cubes and make sure the tofu is at room temperature before cooking. Seasoning the coating fixes blandness.
Panko burned before the tofu cooked. Panko browns fast. Lower the heat by 25°F, check early, and consider switching to cornstarch for high-heat methods.
Leftovers went limp. Store cooled tofu in an airtight container in the fridge for up to 4 days. Reheat in the air fryer or a 400°F oven for 5 to 8 minutes to re-crisp — the microwave will only make it rubbery.
Frequently Asked Questions
Can you make crispy tofu without any oil at all?
Yes, but expect a trade-off. Oil helps the starch coating brown and adds flavor. Oil-free oven or air fryer tofu still gets firm and lightly crisp with cornstarch, but it will not be as golden. If you are minimizing oil, even half a teaspoon makes a noticeable difference.
What is the best type of tofu for crispiness?
Extra-firm tofu is the clear winner. It has the lowest moisture content, holds its shape when handled, and develops a chewy interior with a crisp shell. Vacuum-packed extra-firm is even better if you can find it. Never use silken or soft tofu for this — it will disintegrate.
Why is my tofu soggy in the middle?
Excess water is the culprit. Press the tofu longer, try freezing and thawing it first, cut smaller cubes, and make sure your cooking surface is fully hot with enough space between pieces so steam can escape.
Does freezing tofu really make it crispier?
It makes the texture better, which leads to better crisping. Freezing creates ice crystals that squeeze out water and leave a spongier, chewier structure. After thawing and pressing, the tofu browns beautifully and has a satisfying bite that fresh tofu cannot match.
How do I keep crispy tofu crispy for serving?
Serve it immediately, and toss it in sauce at the very last moment — or serve the sauce on the side for dipping. Keep cooked cubes on a wire rack rather than a plate so steam does not get trapped underneath and soften the bottoms.
Is baked or air-fried tofu as crispy as deep-fried tofu?
Very close, with the right technique. A pressed block, a thin cornstarch coating, high heat, and enough space between cubes produce a crust much like a deep-fried one. You trade a small amount of richness for far less oil and easier cleanup — a trade most home cooks happily make.
The Bottom Line
Learning how to make crispy tofu without deep frying comes down to a simple formula: extra-firm tofu, a real press, a thin seasoned starch coating, high heat, and patience while the crust forms. Whether you choose the oven, the air fryer, or the stovetop, you can get golden, crunchy cubes with a fraction of the oil — and once you have the method down, crispy tofu becomes one of the easiest, most versatile proteins in your weekly rotation.